Plotting Local Coronavirus Cases

Here in Scotland (and in England) the governments publish coronavirus data daily. But they do not show the data in a particularly useful way as it is simply a count of cases confirmed so far. These counts are useful as they can show whether the health service is likely to cope with the outbreak or not today, but they do not show the history of the pandemic.

Jason Leitch Flattening

I believe the important information is to see a graph of the confirmed cases to allow you to judge if the wanted flattening of the curve is happening or not. This curve is explained here by Scotland’s National Clinical Director, Jason Leitch. Also what matters to most people is what is happening locally to themselves and their loved ones.

So I’ve knocked together a MATLAB script to plot some graphs for the Lothian Health Board and the Greater Glasgow and Clyde Health Board in Scotland and the East Sussex Healthcare NHS Trust in England. The script gets its data from Tom White’s GitHub page. As Tom says, this data should be made available officially but does not appear to be published yet in a usable format. Thanks for the data, Tom!

I’m not a MATLAB guru and I’m sure my script could be written better and be more robust. But it works for me. Here is the code. MATLAB is quite expensive (I use it for playing about with radios and electronics) but the script could probably be rewritten in Octave with something replacing the TimeSeries variables. Spreadsheets would  work too but I’m even less a guru in them than MATLAB.

And the grim results, no doubt to become much grimmer due to the expected exponential growth of cases. Early days yet.

Lothian

Glasgow

Esussex

Remember to wash your hands!

SignaLink Jumpers for FT290R

Here’s how to set the jumpers in a SignaLink USB when connecting a Yaesu FT290R.

FT290R Front

I found the jumper instructions on the Tigertronics website just a little too general, so this may save some time.

WARNING: I now think these are wrong. Please see my post of 27th July 2021.

Signalink jumpers for FT290R IMG 1043

The SignaLink works fine with PocketPacket on a Mac mini. ‘Use Vox for PTT’ was set in the PocketPacket Audio Modem preferences. The SignaLink delay knob was turned fully anticlockwise.

Using this setup I could receive and decode signals from a local packet test GM7RYR-10. I transmitted to the ISS packet digipeater but didn’t see any of my packets digipeated. However, I received my packets locally on my Yaesu FT60 and decoded them on a Raspberry Pi via Direwolf by WB2OSZ and Xastir.

PTT for FT290R

I bought an FT290R (thanks Bob!) a few months back and have finally got around to trying it with packet. The PTT circuit I used for the FT60 Raspberry Pi 3B+ works fine so all it needed was to connect up a plug for the front socket as shown here.

Scribbled Pinout

I tested it with Direwolf and Xastir and it seems to work fine. Here’s an audio clip FT290R Packet Audio.flac of a packet being sent from the FT290R. I recorded it using Audacity from my Alinco DJ-C6.

I had hoped that the extra power (25W) from the FT290R would allow the ISS to hear my packets but I’ve had no joy in the couple of passes I’ve tried so far. I can hear packets fine, but the ISS doesn’t digipeat the ones I’ve sent. I changed the APRS path to just ‘ARISS’ having read this aprs.fi blog but that didn’t help either. Perhaps the ISS needs to be at a higher elevation. Or perhaps my rather ramshackle Cebik Moxon aerial needs tweaked.

Bit Banging on PIC12F683

The PIC12F683 Microcontroller comes in a useful 8 pin DIL package. I favour this over smaller devices as it allows my ageing eyes to cope with connecting it to the rest of the circuit.

However, this PIC does not come with a UART and so any text debug needs to be output using ‘bit-banging’. I needed to debug a PWM motor drive so I tried to find an existing implementation of bit-banging on this or similar PICs developed in C but couldn’t find any. So here’s my solution.

This code allows communication at 9600 baud only. This is a reasonable speed for text debug as it allows fairly rapid output but won’t be too fast for any modern computer. The output is digital high and low on the GP0 pin. So highs will be at the supply voltage (Vdd) and lows will be at 0V. For this PIC Vdd is from 2 to 5.5V. I did all my testing with a 5V supply. The communication is 8-bit, no parity and one stop bit (8N1 for short). The remote UART used in testing was a Dangerous Prototypes’ Bus Pirate. The text was displayed on a Mac mini terminal using GNU screen: screen /dev/tty.usbserial-A9048DB4 115200,cs8,-parenb,-cstopb,-hupcl.

The code uses timer 1 as a counter to work out how long to keep the signal high or low. This means the timing of the code you are debugging will be way off as the code does a lot of looping to check the counter registers. But if the code being debugged is timing critical you shouldn’t be using text debug anyway. In that case you are better off simulating, flashing LEDs or looking at signals with a ‘scope or logic analyser.

The meat of the bit-banging code is in the putcharGP0 function. This sets or resets the GP0 port depending on the value of the bit to be transmitted. After each set or reset the code loops waiting for 1/9600 = 104µs. This loop is in the ‘WAIT_SYMBOL_TIME’ macro. This macro takes an argument which allows the loop to be adjusted allowing for the time taken to run the code between each bit. The macro is called ‘WAIT_SYMBOL_TIME’ as in this case each symbol is a single bit. Each character has a start bit, 8 data bits and a single stop bit. 

The code is built using this make file which uses Microchip’s xc8 C compiler and programs the PIC using a PICkit2.

Preparing MP3s for an Evoke 3 Radio

I use an Evoke 3 radio made by Pure to listen to music. It has a very good sound — at least to my cloth ears. One of its features is that it plays MP3s from an SD card. But its firmware is quite old-fashioned perhaps because of technical limitations. It displays the song information but can only understand ID3v1 tags. The world has moved on and ID3v2 tags are now the default for most devices. Also the Evoke displays all files even those which are hidden on computers by having a dot as the first character. This makes the display of the folders and songs messy.

I used to deal with the tagging by using a very good application called kID3 to copy the ID3v2 tags to ID3v1 tags in its GUI. I have recently been reading “The Art of Unix Programming” by Eric Steven Raymond and it prompted me to write a script to do the tagging. I’ve since seen that kID3 can be driven from a CLI so that may be a better way to do the tag copying. 

Kid3 screenshot

I looked for command-line utilities to copy tags and couldn’t find any. But the good folks in the Perl community provide a library called MP3::Tag which allows easy manipulation of MP3 tags — as long as you can write in the Perl language. The library is available on CPAN but I used the MacPorts version. Many moons ago I could write Perl in my sleep so I decided to dust off the necessary neurones and write a Perl script. 

The Perl script ‘mp3-tag-convert.pl’ is not new and exciting but may help as an example for whatever you want to do. The script looks at all the MP3 files in a folder and copies the ID3v2 tags to ID3v1 if they don’t already exist. It will also copy the ID3v1 tags to ID3v2 if they don’t already exist. 

For my purposes I needed some other scripts. I had already written a shell script ‘tidy-mp3s’ to tidy MP3 folders of extraneous files that MacOS leaves lying about for its own purposes but that show on the Evoke 3 cluttering up the display.

I also needed a script to put it all together. ‘mp3s-to-evoke.ksh’ is a script which tags the MP3s in the way that suits the Evoke 3 and then copies them to the Evoke 3.So when I decide to change the songs on the Evoke 3 (it only handles a 2GB disc) I can just call the script in each MP3 folder on my computer and it will get copied to the Evoke 3.


Screen Shot of Evoke script runThe scripts are in this compressed file: evoke-scripts.zip.

I use Korn shell (ksh) for scripts because that’s what I grew up with. I think the scripts should run under Bash if that’s what you prefer.

So now my Evoke 3 screen is nice and clean.

Evoke 3 Running MP3s

Cebik Moxons in the Attic

I now have both 2m and 70cm Cebik Moxons in the attic separated using a HA8LFK diplexer. After trying out the 70cm aerial it is clear that it needs a preamp to pick up any signals. Partly this is due to the poor coax I’m using and I should replace it with something better. So I’ve added an M-100 preamp powered from a shack PSU through a pair of bias-tees.

I tried bypass the M-100 with a relay but I haven’t been able to source a relay that works well at UHF. Usually the non-connected path is only 20 or 30 dB down on the connected path. This is not safe enough to protect the preamp, so that’s another reason for giving up transmitting for now. I’m pretty sure the aerials will not be good enough for decent transmissions and I would end up being the recipient of pleas from an OM: “I got the Mike, Zero and Yankee, your callsign again again please…”.

The setup looks like this scribble from my lab book:

Scribble form lab book

Unfortunately the M-100 draws 55mA which is 5mA too high for the built-in bias-tee in the SDRplay RSP2. The RSP2 is my receiver of choice at the moment. More on that later.

Cebik Moxons, SDRplay and satellites

There was a pass of the AO-91 satellite over my location today and I listened to the ham radio operators operating through it.

I used my home-built Cebik Moxon aerials which are located in my attic and the nice SDRplay RSP2.

Cebik Moxon in attic

Here’s a screenshot of SDRuno displaying the AO-91 signals for those of you who don’t think the Doppler effect is real.

Doppler on Waterfall

You can easily see the received signal changing frequency as the satellite hurtles past.

This is what it sounds like. 

AO-92-12.09-Wednesday-May-8-2019-20190508-1209.m4a

It was recorded using Audio Hijack Pro from a Microsoft Remote Desktop session of SDRuno on a Dell XP workstation. Apologies for the over-driven audio — I was concentrating on receiving rather than recording.

SDRplay Macs and Linux

The Good News

I bought an SDRplay RSP2 recently and have been enjoying using it a lot. The RSP2 has three antenna connections and covers from 1kHz to 2GHz. It is amazingly good value. SDRplay provide a nice receiver application called SDRuno. The SDRplay website has links to reviews of the RSPs and they must be pleased with them.

RSP2

The Bad News

My shack is full of computers accumulated over the years. However, as far as Microsoft Windows machines are concerned I only have an ageing Dell Precision 380 running Windows XP and a VirtualBox VM on a Mac Mini running Windows 10. My W10 VM isn’t fast enough for SDRuno and the audio stutters. The XP machine is usable as long as the sample rate is kept low and you decimate a lot.

On Macs and Linux computers SDRplay only provide an API/HW Driver, although they do provide a full image to boot a Raspberry Pi from. The software for Mac and Linux is CubicSDR which just about does the job but does not have all the features of SDRuno. I prefer GQRX  and have managed to get it working on macOS but the Hi-Z antenna connexion only works intermittently. It’s all quite unsatisfactory. It’s frustrating to have such good hardware spoilt by the lack of easy-to-install software. You get sucked into handling a morass of libraries with differing versions and it’s time-consuming if not impossible to find out which versions you need to use.

The Raspberry Pi image works well as long as you connect an HDMI display. I prefer to run my Raspberry Pi through Microsoft Remote Desktop so I don’t have multiple monitors, keyboards and mice on my desk. But with Microsoft Remote Desktop CubicSDR does not display well at all.

I only hope that SDRplay comes out with SDRuno on other platforms other than Windows. 

In Other News…

So I’m currently using the Dell XP computer with SDRuno run through Microsoft Remote Desktop as the best solution for me, even though it isn’t supported. Don’t worry, my insecure Dell XP is only connected to my LAN and is not connected to the Internet.

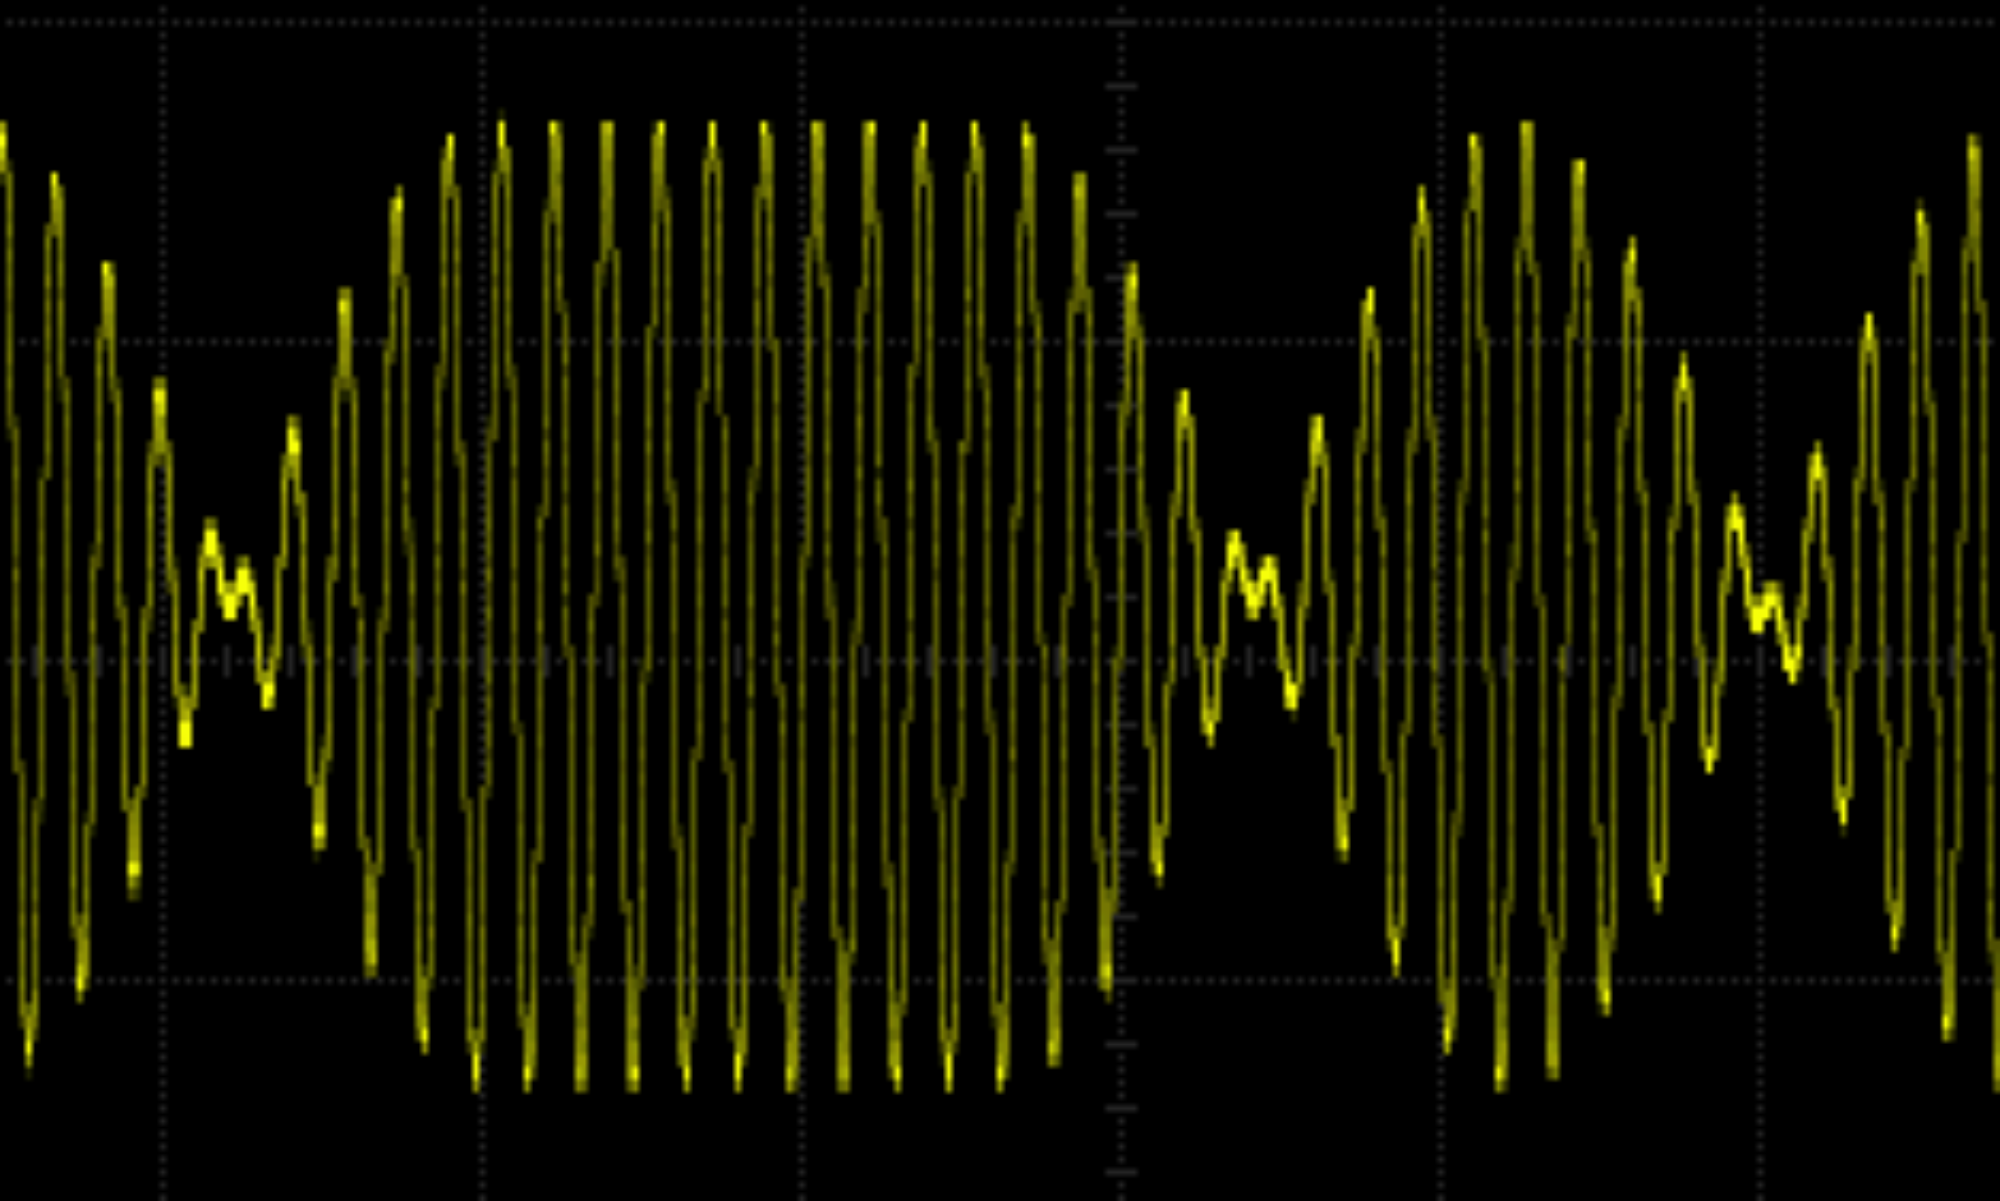
The blue arrow points to the low sample rate and high decimation needed on the Dell XP.

Screen Shot 2019 05 08 at 15 17 58

But it works well enough, it just doesn’t use the capabilities of the RSP2.

Screen Shot 2019 05 08 at 15 18 16

SDRplay Safety


I bought an SDRplay RSP2 SDR recently. I had been looking for a multimode VHF/UHF transceiver but couldn’t find one within my budget. The transceivers that get listed on eBay go for silly prices and I’m not sure I want to pay the asking price for a new model. 

So I’ve decided to concentrate on receiving signals from satellites rather than transmitting, hence the purchase of the RSP2.

One of the specs of the RSP2 is the maximum signal it will tolerate at its aerial inputs. It says 0dBm which by my calculations says the voltage at the input must be under 0.22 Vrms to be safe. This sent alarm bells ringing as my Cebik Moxon aerials share the same attic as my small transmit loop aerial.

So I made some measurements.

I measured the voltage seen in the shack from the Cebik Moxons when transmitting 10W to the magnetic loop. The measurements were on my HP 54615B scope with a 50Ω termination.

No RF 800µV
TS590S tune (10W) 191mV at 14.2 MHz
TS590S tune (10W) 288mV at 7.07 MHz

So my RSP2 is unsafe in its current location and configuration. I must not transmit using my HF rig if I have the RSP2 connected to my Cebik Moxon aerials.

My first thought was to put a high pass filter on the Cebik Moxons to block 6m and below. I’m sure this would work but there would be some insertion loss.

But I have an Moonraker M-100 masthead preamp which has a 24-2300 MHz filter. This wouldn’t block 10m and 6m, but I don’t transmit on those bands using the small transmit loop and if I did the radiated power would be quite small as the impedance mismatch would be high.

So I made some more measurements with the M-100 in the shack. I know these won’t give the same effective gain at the receiver as measurements made with the M-100 in the attic, but it’s close enough for a start. The dial on the M-100 is laughable as the gain you get at each position bears only a passing relationship to the actual gain. The most you can say is the more clockwise the dial the higher the gain. Hence the ‘on dial’ below.

• Zero gain (on dial)
No RF 18mV
10W 14.2MHz 32mV
10W 7.07MHz 39mV

• gain +10 (on dial)
No RF 18mV
10W 14.2MHz 25mV
10W 7.07MHz 53mV

• gain +20 (on dial)
No RF 19mV
10W 14.2MHz 559mV
10W 7.07MHz fuzzy on the scope so I assume the signal is distorted somehow

• gain at 12 o’clock
No RF 18mV
10W 14.2MHz 50mV
10W 7.07MHz 16mV

This looks promising as the preamp gain should be set to just retrieve the loss from the cable and this should end up being 12 o’clock or lower.

The next step is to install the M-100 in the attic and re-measure. I’ll probably use a bias-tee arrangement so I can power it from the shack.


CHIRP Programming

I use a Yaesu FT-60 for my satellite radio. It’s a little onerous to manually  program satellites into it so I use the CHIRP application to do the programming.

I can’t use my FT-60 programming cable directly on macOS (my native OS) because it has a Prolific chipset for USB/serial operation and its driver clashes with the FTDI chipset which is in other USB/serial devices I use.

I first used a Windows 10 virtual machine (VM) under VirtualBox to run CHIRP. This worked fine. But I only use Windows 10 sporadically and when I start Windows 10 it nearly always wants to reboot to do an update. This is tedious and slows things down a lot. I spent more time waiting for Windows to update than running CHIRP.

So I’ve put a Ubuntu VM onto VirtualBox and now run CHIRP quite happily from there. Hopefully Ubuntu won’t insist on upgrading quite so often as Windows 10 does.