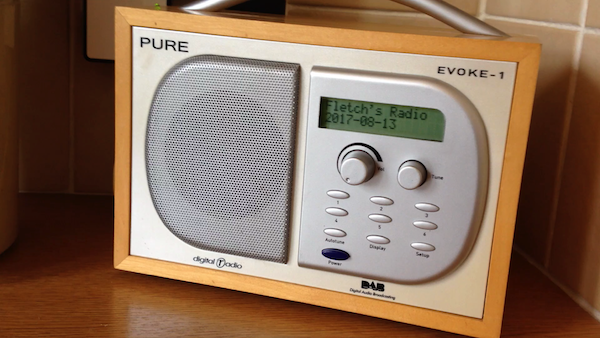
Internet Radio
My house was built in 1929 when they didn’t cater for wifi and made the walls out of stone. So the wifi signal from my ISP’s router doesn’t travel far. Recently, the ISP updated the firmware in its router and it now crashes if I connect a wifi bridge with the same SSID to extend the coverage. This means that in my kitchen I can’t get reliable wifi. I like to listen to music while doing kitchen chores so this is a bind. I can’t face trying to get my ISP to fix this problem as LAN works well otherwise – so I’ve found another solution.

I have an old DAB radio – a Pure Evoke 1 – which is now broken. The RF card doesn’t work, but the audio card works fine. I’ve removed the RF card and connected a Raspberry Pi running cmus. cmus is a music player that can play MP3 internet streams. The Raspberry Pi model B+ has an ethernet socket and an analogue output for audio. I’ve connected the analogue output to the Evoke audio card which amplifies and plays it to the speaker on the Evoke 1. The Evoke 1 also has a card which connects to the buttons and LCD display. I laboriously worked out which pins on this card are which and can use the buttons and LCD via the Raspberry Pi. I use buttons 1–6 as internet radio presets, and the other buttons to display the station name, pause or play the radio and one for reboot. The LCD display shows either the song playing or the station name. I connect the radio to the internet via a TP-Link powerline adaptor. So my wifi problems are gone, at least for internet radio.
The radio is now being used and works well enough for me. See this short video.
There are a couple of drawbacks, however. The radio takes 40s from power on to playing the music which is mildly annoying. The Raspberry Pi only just fits inside the case of the Evoke 1 and I haven’t yet put in sufficient shielding to stop the audio card picking some digital noise from the Raspberry Pi. When playing music I can’t hear this noise – it’s only apparent when booting up or when a station is paused.
The radio software runs on the Raspberry Pi Raspian OS. It comprises the cmus music player, a control program, a driver for the LCD display, and some ancillary scripts.
- The
start_cmusscript is started when the Raspberry Pi boots via crontab. The scripts startscmus, the control program and startscmusplaying. - The control program
cmusradio.cuses the WiringPi library (provided by @drogon – thanks!) to monitor button presses via interrupts. Luckily the card connecting the buttons on the Evoke 1 must have some hardware debounce circuitry so this is straightforward. It then tunes to the station on preset 1 and configurescmusto display song information on the LCD using mycmus-status-displayscript. It then goes into a loop monitoring if any button presses were seen in interrupts and acts on those button presses viacmus-remote. - The
cmus-status-displayscript is called bycmuswhen its status changes. It extracts the song information and displays it on the LCD. - The
lcdsendprogram uses theWiringPilibrary to write to the LCD. - The code, scripts and make files are in this zip file for your delight and education.
- I haven’t included the wiring diagram. Instead here is a Venn diagram of why not:
